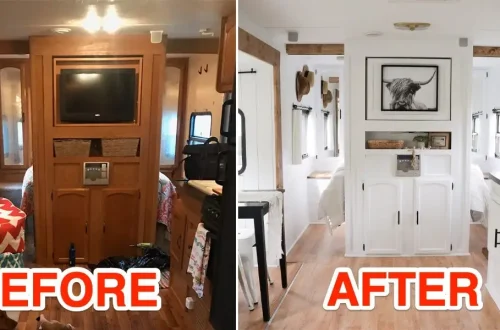
Taking on an RV renovation can be one of the most rewarding projects you’ll ever do. It’s not just about updating an old rig, it’s about crafting a space that truly feels like home on the road. Whether the goal is to modernize an older camper, improve functionality, or simply add more personality, planning is the backbone of success. Renovations can quickly spiral out of control without a well-thought-out plan, especially when working in such a compact, mobile space. Over time, I’ve learned that the difference between a smooth renovation and a stressful one usually comes down to preparation, budgeting, and a clear vision.
Visualizing the End Result
Every renovation starts with a vision. Before I ever pick up a tool or browse materials, I like to close my eyes and imagine how I want the finished space to feel. Do I want it bright and airy, or cozy and rustic? Functionality matters just as much as aesthetics, so I take note of how I’ll actually use each area.
Maybe I need a dedicated work area for travel days when I’m writing or working remotely. Or perhaps I want more kitchen storage for cooking off-grid. By defining what I want the space to accomplish, it becomes easier to make design decisions later. Creating a vision board, either digitally or on paper, helps me gather inspiration. I include color palettes, flooring ideas, cabinetry styles, and even light fixtures that match the look I’m after.
Once the vision is clear, I make a rough sketch of the layout. Even if it’s not to scale, it helps visualize how changes will affect the flow and functionality of the space. This step makes it easier to spot potential issues before they become expensive mistakes.
Setting a Realistic Budget
One of the most important steps in planning an RV renovation is setting a budget that reflects reality. It’s easy to underestimate how much things will cost, especially if you’re working with older rigs that may hide surprises like water damage or electrical issues.
I start by listing every project I want to tackle, then assign an estimated cost to each one. Flooring, paint, appliances, and hardware add up quickly. I also factor in costs for tools, cleaning supplies, and unexpected repairs. Once I have the total, I add an extra 15 to 20 percent for contingencies. That safety buffer has saved me from frustration more times than I can count.
Sometimes I’ll prioritize upgrades in phases to spread out expenses. For example, I might start with flooring and cabinets this season, then move on to lighting and upholstery later. Sticking to a phased plan keeps the renovation manageable without straining finances or sanity.
Evaluating the Condition of Your RV
Before diving into demolition or design, assessing the RV’s current condition is essential. I always inspect every nook and cranny to identify problem areas. That includes checking for leaks around windows and the roof, examining walls for soft spots, and inspecting the plumbing and electrical systems.
Catching issues early saves time and money. There’s nothing worse than painting over a wall only to discover hidden mold or rot later. I also look underneath the RV and inspect the undercarriage for signs of rust or damage. The mechanical and structural integrity must come first.
If I find issues I can’t handle myself, I get professional advice. It’s better to fix foundational problems before spending time and money on cosmetic improvements.
Defining Priorities
Not every part of an RV needs a complete overhaul. Deciding what matters most ensures the renovation stays focused. I like to categorize tasks into “must-haves,” “nice-to-haves,” and “future upgrades.”
For instance, if the flooring is damaged or unsafe, that’s a must-have. Replacing perfectly good cabinet doors just for a new color might fall under nice-to-have. Prioritizing helps me allocate budget and time effectively. It also gives me a clear sense of accomplishment as I finish each major task.
Creating a Timeline
A solid renovation plan includes a timeline. Without one, it’s easy for the project to drag on indefinitely. I start by breaking down the renovation into stages: demolition, structural repairs, painting, flooring, cabinetry, and finishing touches. Then I estimate how long each phase should take based on my availability and tools.
If I’m living in the RV during renovations, I plan tasks around livability. For example, I avoid removing both the bed and kitchen fixtures at the same time. I also account for drying times for paint, sealants, or adhesives, since rushing these steps can lead to poor results.
Unexpected setbacks are inevitable, so I give myself flexibility within the schedule. If I plan for three weeks, I mentally prepare for four. That buffer prevents burnout and frustration.
Gathering Tools and Materials
Having the right tools makes the process smoother. Before starting, I create a checklist of what I’ll need: drills, saws, sanders, measuring tape, caulking guns, and safety gear. I prefer quality over quantity, focusing on tools that are durable and portable.
For materials, I pay attention to weight. Every added pound affects fuel efficiency and towing capacity, so I look for lightweight alternatives when possible. Composite flooring, aluminum trims, and PVC panels are excellent options.
I also prefer materials designed for small spaces or RV use because they handle movement and temperature changes better. For example, flexible adhesives and moisture-resistant paints hold up longer than standard home products.
Planning the Demolition
Demolition is one of the most exciting yet chaotic parts of any renovation. Before tearing things out, I take detailed photos and measurements. These references help when reinstalling or modifying components later.
I always turn off power and water connections before removing fixtures. Then, I start from the top down, first cabinets, then furniture, and finally flooring. Keeping the process organized helps minimize mess and confusion.
After everything is cleared, I do a deep clean. A blank, clean space makes it easier to visualize what’s next and ensures paint and adhesives adhere properly.
Designing for Functionality
While aesthetics matter, functionality determines how comfortable an RV feels day to day. I think about how I move through the space and design around that flow. If I cook often, I want ample counter space and easy access to utensils. If I work remotely, I design a small workstation near a window for natural light.
Storage is another key factor. I use vertical space for shelving and consider hidden storage options under seating or beds. Every inch matters, so multipurpose furniture becomes a great investment.
Lighting also plays a huge role in both design and practicality. Swapping outdated fixtures for LED strips or recessed lighting can instantly modernize the space while reducing energy use.
DIY vs. Professional Help
Not every project is suitable for DIY, especially when it involves electrical or plumbing systems. I’m comfortable painting, building furniture, and installing flooring, but I never hesitate to call professionals when needed. Safety comes first, and certain installations must meet specific standards.
That said, doing what I can myself saves a significant amount of money. Painting walls, updating fixtures, and building storage solutions are manageable for most people with patience and basic tools. Watching tutorials and asking for advice from other RV renovators can boost confidence and skill level.
Maintaining Momentum
Large renovation projects can feel overwhelming. It’s easy to lose steam halfway through. To stay motivated, I break the renovation into small, achievable goals. Completing one section at a time keeps me encouraged.
I also remind myself why I started. Each improvement brings me closer to the dream of traveling in a space that feels truly mine. I take breaks when needed, but I never lose sight of the final vision.
Sometimes, simply cleaning up after a messy day or rearranging tools helps reset motivation. Progress might be slow, but steady effort adds up.
Personalizing the Space
The best part of an RV renovation is adding personal touches that reflect my personality and travel lifestyle. I choose colors, textures, and decor that inspire me. Soft earth tones create a calming atmosphere, while bright hues energize the space.
Adding family photos, plants, or artwork makes the RV feel warm and inviting. Swapping standard fixtures for stylish ones gives it a custom look without overspending. Even small changes like replacing cabinet handles or adding peel-and-stick backsplash tiles can transform the vibe.
Every detail contributes to making the RV a reflection of who I am. That sense of ownership turns it from just a vehicle into a true home.
Testing Everything Before Hitting the Road
Once renovations are complete, I take time to test everything before setting off. I check drawers, hinges, and doors to ensure nothing swings open while driving. I verify that plumbing connections are leak-free and that electrical systems function properly.
It’s also wise to take a short test trip. Driving a few hours helps identify any issues that need adjustment. Sometimes furniture shifts or fixtures loosen slightly, and catching these early prevents bigger problems later.
Documenting the Journey
Renovating an RV is as much about the process as it is about the result. I like to document progress through photos or journals. It’s rewarding to look back at where I started and see how much has changed.
Sharing updates with fellow RV enthusiasts also fosters a sense of community. Many times, I’ve found encouragement, ideas, or problem-solving tips through others’ experiences. Each renovation becomes a shared story of creativity and persistence.
Final Thoughts
Planning an RV renovation is equal parts creativity, strategy, and perseverance. It’s about transforming a small, mobile space into a personalized retreat that fits your lifestyle. With clear goals, realistic budgeting, and a willingness to adapt, anyone can bring their vision to life.
The most valuable lesson I’ve learned is that an RV renovation isn’t just about building a better space, it’s about building a deeper connection to the journey itself. Every brushstroke, screw, and design choice reflects not just craftsmanship, but also the spirit of freedom and individuality that comes with life on the road. When you finally step into your finished RV, surrounded by your own handiwork, the sense of accomplishment and excitement is worth every bit of effort.