Caulking an RV is one of those maintenance tasks that can make a huge difference in how well your rig holds up over time. It may not be the most exciting project, but it’s essential for keeping your RV dry, comfortable, and protected from the elements. Every joint, seam, and window edge on your RV is a potential entry point for water, dust, and air, and if not properly sealed, these small openings can lead to leaks, mold, or even structural damage. I’ve found that learning how to caulk properly not only saves money on repairs but also gives me peace of mind during rainy nights or long trips through rough terrain.
Why Caulking Is So Important
RV exteriors are constantly exposed to the sun, wind, and moisture. Over time, sealants dry out, crack, or peel away, leaving gaps that allow water to seep in. Once moisture enters, it can cause hidden damage that’s often expensive to repair. By regularly inspecting and caulking the RV, I’ve been able to prevent leaks before they even start.
Caulking also improves insulation. It helps maintain a comfortable temperature inside by preventing drafts and keeps the air conditioner or heater from overworking. Properly sealed seams also stop insects and dirt from sneaking into the RV, making it feel fresher and more secure.
Identifying Areas That Need Caulking
Before starting, I take a careful walk around the RV and inspect every seam, joint, and edge. The most common spots that require attention are around windows, doors, roof vents, slide-outs, and corners. Roof seams and edges where different panels meet are especially prone to cracking due to the constant flexing of the RV while driving.
I run my fingers along the seams to feel for gaps or uneven surfaces. If I notice that the sealant is brittle, chalky, or peeling, it’s time to reapply. Even if a seal looks intact, I’ll recheck it after washing the RV or after a heavy rainstorm. Leaks often show up as damp spots or discoloration inside the walls or ceiling, so I stay alert for those signs too.
Selecting the Right Sealant
The type of sealant you use matters more than you might think. Different materials serve different purposes, and using the wrong one can lead to poor adhesion or premature failure. I’ve made it a rule to always use products specifically designed for RVs. These sealants are made to flex with the movement of the vehicle and resist UV rays, temperature changes, and road vibration.
For the roof, I usually go with a self-leveling lap sealant. It spreads evenly and is perfect for flat horizontal surfaces like roof seams and around vents. For vertical surfaces such as sidewalls and window frames, a non-sag sealant works best because it stays in place without dripping.
Butyl tape is another favorite for certain areas. It’s a flexible, sticky tape used between window or vent flanges and the RV wall before tightening them down. It creates a watertight seal that remains pliable over time.
Gathering the Right Tools
Having the right tools on hand makes the job smoother and less frustrating. I always keep a caulking gun, plastic scraper, rags, mild cleaning solution, isopropyl alcohol, masking tape, and disposable gloves. If I need to remove old caulk, I also use a putty knife or plastic razor blade.
A steady hand and good lighting are essential. I prefer working on a dry day with mild temperatures since moisture or extreme heat can interfere with the sealant’s adhesion.
Preparing the Surface
Preparation is the foundation of any successful caulking job. I start by removing all old, cracked, or loose sealant. This part can be tedious, but it’s crucial. If I apply new caulk over damaged or dirty material, it won’t stick properly and the seal will fail quickly.
Using a plastic scraper, I carefully peel away the old sealant without scratching the RV’s surface. For stubborn areas, a bit of heat from a hairdryer softens the material, making removal easier. Once all residue is gone, I clean the area with soap and water, followed by isopropyl alcohol to ensure it’s completely free of grease or dirt.
After cleaning, I allow the area to dry completely. Even a small amount of moisture can trap bubbles or prevent the sealant from adhering correctly.
Applying Masking Tape for Clean Lines
To get neat, professional-looking results, I use masking tape to outline both sides of the seam before applying caulk. This prevents excess sealant from spreading onto nearby surfaces and helps me maintain straight, clean edges. I make sure the tape is firmly pressed down so that no caulk seeps underneath.
Once everything is ready, I load the sealant tube into the caulking gun and cut the tip of the nozzle at a 45-degree angle. The size of the opening depends on the width of the seam I’m filling, usually, a small cut is enough.
Applying the Sealant
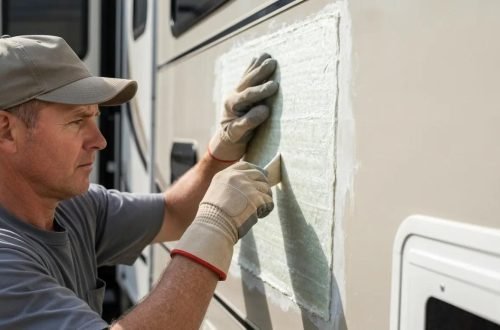
When applying the sealant, I start at one end of the seam and work steadily toward the other. I use even pressure on the caulking gun trigger to create a smooth, continuous bead. Moving too fast can leave gaps, while going too slow can cause buildup.
The goal is to fill the seam completely without overdoing it. Once applied, I smooth the bead using my gloved finger or a caulking tool, pressing gently to ensure it adheres well and fills any tiny voids. Smoothing also improves appearance and prevents the edges from lifting later.
I remove the masking tape immediately after smoothing the caulk. Waiting too long can cause the dried edges to pull away when the tape is removed.
Allowing Proper Drying Time
After application, I always check the drying instructions on the product label. Most RV sealants require at least 24 hours to cure fully, though some may take longer depending on humidity and temperature. During this time, I avoid washing the RV or exposing it to rain. If possible, I park it in a dry, shaded area.
Proper curing ensures that the sealant forms a strong, flexible barrier that will last for months or even years. Skipping this step or rushing the drying process often leads to cracks or leaks later on.
Sealing the Roof
The roof is one of the most critical areas to seal properly since it takes the brunt of weather exposure. I make it a habit to inspect it at least twice a year, once in spring and again before winter storage.
For minor cracks or gaps, I use a self-leveling sealant and apply it generously over the damaged areas. I spread it with a putty knife to ensure full coverage. For larger damaged spots, I may need to remove the old section of sealant completely before applying new material.
I pay close attention to roof vents, skylights, antenna bases, and air conditioning units. These components often shift slightly while driving, so their seals wear down faster.
Addressing Windows and Doors
Windows and doors are prime spots for leaks. I inspect the seams around them for peeling or dried-out caulk. If I see gaps, I carefully clean the area and reapply a non-sag sealant. For added protection, I make sure to seal both the inner and outer edges where the frame meets the wall.
In some cases, I’ll use butyl tape beneath the window frame before tightening it back into place. This provides a second layer of defense against water infiltration. Once the frame is secure, I finish with a clean bead of sealant along the perimeter.
Sealing Seams and Corners
The seams and corners of the RV’s exterior panels tend to flex with every mile on the road. This constant movement can cause cracks, so I check these areas regularly. I apply a flexible sealant designed to handle vibration and movement.
Corners often require more attention, so I apply slightly more material and smooth it out evenly. This helps create a reinforced barrier that won’t crack easily under pressure.
Common Mistakes to Avoid
Caulking might seem simple, but there are a few mistakes that beginners often make. Applying too much sealant is one of them. It might seem like more is better, but excessive caulk can lead to messy finishes and wasted material. The key is to use just enough to fill the seam completely.
Another common mistake is skipping surface cleaning. Any dust, oil, or old caulk residue can prevent proper adhesion. I’ve also learned not to apply sealant in very hot or cold conditions since extreme temperatures can affect how it cures.
Finally, I avoid mixing different types of sealant unless I’m sure they’re compatible. Incompatible materials can cause peeling or separation over time.
Regular Maintenance and Inspection
After completing a caulking project, I mark the date in my maintenance log. This helps me remember when it was last done and plan future inspections. I usually check all seals every three to six months, especially before long trips or after extreme weather.
During inspections, I look for small cracks or discoloration, which are signs that the sealant is aging. By addressing these issues early, I prevent larger problems down the road.
Using the Right Cleaning Techniques
Once the sealant is fully cured, I keep it in good shape by cleaning it gently. Harsh chemicals or abrasive tools can damage the surface. I use mild soap, water, and a soft cloth to wipe down the sealed areas.
Regular cleaning prevents mold and dirt buildup, which can weaken the sealant over time. It also helps maintain the RV’s overall appearance and protects against UV damage.
Seasonal Tips for Better Results
I’ve found that spring and fall are the best times for caulking projects. The temperatures are usually mild, and humidity levels are balanced, which helps sealants cure properly.
In summer, I try to work early in the morning or late in the evening when the RV surface is cooler. In winter, I make sure to store the sealant indoors so it stays pliable and easy to apply.
Building Confidence with Practice
Caulking may feel intimidating at first, but with a bit of patience and practice, it becomes second nature. My first few attempts weren’t perfect, but I improved by paying attention to small details like even pressure and smooth finishes. Over time, I developed a rhythm that made each project faster and cleaner.
Every RV owner should get comfortable with this task. It’s one of the easiest ways to protect an investment and extend the life of an RV. The more often you inspect and maintain your seals, the fewer surprises you’ll face on the road.
Final Thoughts
Caulking your RV may seem like a minor task, but it plays a major role in preventing leaks, drafts, and long-term damage. With the right materials, proper preparation, and a steady hand, anyone can achieve professional-quality results. Regular maintenance and inspections will keep your RV protected, energy-efficient, and looking great for years to come.
By taking the time to master these caulking tips, you’ll feel more confident in caring for your RV and ready to tackle any sealing project that comes your way. Each successful repair strengthens your connection to your home on wheels, and ensures it’s ready for every adventure ahead.